

How To Change Font Size In Photoshop

An Easy Style To Prepare Your Type Size In Photoshop
In this tutorial in our serial on working with blazon in Photoshop, we'll learn a peachy way to set the correct size for your type when calculation text to your designs and images, one that lets you easily scale your text to any size you demand and gives you a alive preview of the results! If you lot're notwithstanding using the Font Size option in the Options Bar to set your blazon size, you'll find this technique a whole lot easier.
This tutorial assumes you already have a basic understanding of how to add type to a Photoshop document. If you need a refresher on the basics, yous'll desire to check out our Photoshop Type Essentials tutorial first.
Here's a document that I currently have open up on my screen (the photo is from the Fotolia paradigm library):

The original document.
I want to add some text along the bottom of the document, so I'll select my Type Tool from the Tools panel:
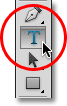
Selecting the Blazon Tool.
With the Type Tool selected, I'll choose a font and font style from the Options Bar:

The font (left) and font style (right) options.
To alter my type colour, I'll click on the colour swatch in the Options Bar. At the moment, my type is gear up to its default color of black:

Clicking on the color swatch to change the type color.
Clicking the color swatch opens Photoshop'due south Color Picker, but instead of choosing a colour from the Colour Picker, I'yard going to sample a colour direct from the image. To do that, with the Color Picker still open, I'll move my mouse cursor over the photo, which temporarily switches me to the Eyedropper Tool. I'll motion the eyedropper over an surface area of the image that contains the color I want for my text, so I'll click on that area to sample the color:

Sampling a colour from the epitome to use as the type color.
With my color sampled, I'll click OK to close out of the Color Picker. The color swatch in the Options Bar now displays the new color:

The new type colour appears in the color swatch.
All I need to exercise now is choose a size for my blazon, just this is where we run into a bit of a problem. Commonly, to fix the font size, we use the Font Size option in the Options Bar. Nosotros can either enter a value manually into the input box or nosotros can click on the small arrow to the right of the input box and cull from a list of common preset sizes. That'south great if I happen to know the exact font size I need, but in this example, equally in most cases, I don't, which means I have to approximate, usually with trivial to no take a chance of getting information technology correct. Since I have to pick something, I'll choose a preset size of 48 pt. That seems like a good choice:

Choosing one of the preset type sizes.
With my font size chosen and all of my other type options set, I'll click inside the document with the Type Tool in roughly the spot where I want my type to begin, then I'll add together my text. When I'yard done, I'll press Ctrl+Enter (Win) / Command+Return (Mac) on my keyboard to accept the text. Here's what my first attempt looks similar with my type set to 48 pt:

The initial font size was also pocket-size.
Looks like my commencement guess at a font size was fashion off. The text is much too pocket-sized, but I nevertheless don't know the specific size I need. All I know then far is that it needs to be larger than 48 pt. This leaves me with a few options. I could try choosing a different, larger size from the list of preset sizes (although the largest preset size is only 72 pt which still may non be large enough), or I could try entering my own value manually into the Font Size input box, merely what should that value exist? This "trial and mistake" approach to setting the font size in the Options Bar can become frustrating very speedily. There must be an easier style to practice this.
As it turns out, at that place is, but it doesn't involve the Font Size option in the Options Bar. Instead, I'm going to use Photoshop's Gratis Transform control. To access the Free Transform control, first make certain your Blazon layer is selected in the Layers console:
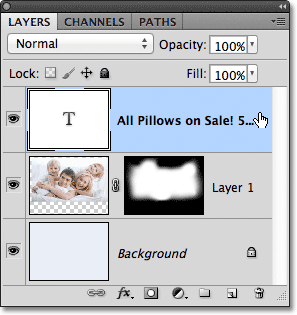
Make sure your Type layer is selected (highlighted in blue) in the Layers panel.
With the Type layer active, go upward to the Edit bill of fare in the Menu Bar forth the top of the screen and choose Free Transform. You tin can too press Ctrl+T (Win) / Command+T (Mac) to apace select Free Transform with the keyboard shortcut:
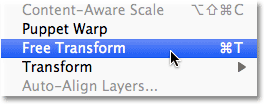
Go to Edit > Free Transform.
This places the Free Transform bounding box and handles effectually the text, and we can now calibration the text to whatsoever size we demand simply by dragging the handles! This will besides give us a alive preview of the results equally we're resizing the text, which ways we tin easily scale it to the correct size with no guess work needed. Since type in Photoshop is made from vectors, not pixels, we're free to scale it equally much as we want without whatever loss of image quality.
To scale the text, hold downward the Shift central on your keyboard, and then click and drag any of the iv corner handles (the petty squares). Holding the Shift key down every bit you elevate the handles tells Photoshop to keep the original aspect ratio of the type intact so you don't stretch and distort the shapes of the letters. When y'all're washed scaling the text, release your mouse push, and so release your Shift key (make certain you lot release your mouse button before releasing the Shift fundamental, otherwise you may even so end up distorting the text):

Hold Shift while clicking and dragging whatever of the corner handles to calibration the text.
You lot can also move the text into position while Free Transform is agile. Merely click anywhere within the Free Transform bounding box and, with your mouse push still held downwards, elevate the type to its new location. There's no need to concur the Shift key down when moving the text. Here, I'm centering my text in the document:

Click and drag anywhere inside the Complimentary Transform bounding box to move and reposition the text.
When you're happy with the size and position of your type, press Enter (Win) / Render (Mac) on your keyboard to take the change and leave out of Gratis Transform mode. The bounding box around the type volition disappear:

Printing Enter (Win) / Return (Mac) to leave out of Complimentary Transform when you're done.
If we wait support in the Options Bar, we see that Photoshop has automatically updated the Font Size pick with our new type size:

The new type size is displayed in the Font Size option in the Options Bar.
Other Stuff
© 2022 Photoshop Essentials.com.
For inspiration, not duplication.
Site pattern by Steve Patterson.
Photoshop is a trademark of Adobe Systems Inc.
Source: https://www.photoshopessentials.com/basics/type/font-size/
Posted by: smithfoure1955.blogspot.com
0 Response to "How To Change Font Size In Photoshop"
Post a Comment